Smile with a Bezier Curve

Weather and Mood
If you asked how was the whether few weeks ago, I would definetly make my face like this πŸ˜”

Well… even now it still not πŸ™‚ So I thought about checking my mood everyday using a simple app. By my mood, I mean how curvy my smile is. Our app shows a smiley face with a greeting. I picked a date that Winter became one of the worst and set it as the start date. And the end date could be somewhere the Summer starts for real (after all this is Michigan I’m talking about).

Let’s program your mood
How about an illustration of your mood for each day with some greeting πŸ€”

We use SVG (Scalable Vector Graphics) to draw the smiley face. If you are not familiar with SVG… SVG is a light weight, XML-based image format that defines vector graphics in web. Though there are few different ways of using SVG, we will directly use SVG with JSX syntax in our example.

Recently, I started learning React. Why not use it then. In this article, we discuss the use of React functional components and Bezier Curve with SVG Path element.

First, let’s see how to draw a Bezier Curve using SVG Path element. At the beginning (that means a Winter day), the app starts with a sad expression and it grows into a full smile over time. How do we define the depth of the smile? Easy!! This is how it is going to look like. The face A is the smile on the start date and the face B is the middle of the time line. The face C is the end date.

The depth or height (+h or -h) of the smile can be calculated as follows.

We draw the Bezier Curve with M and C commands. Format is as follows.

<svg cx="0" cy="0" height="400" width="400">
	<path d={`M x1 y1 C x2 y2 x3 y3 x4 y4`}/>
</svg>

The M command means β€œMove” to the absolute coordinates (x1 ,y1). The C command takes three points. The first two points, i.e. (x2, y2) and (x3, y3) define the location of two Bezier curve handles. The last point (x4, y4) is the end of the curve. All these points are absolute values for C (upper-case) command. For c (lower-case), the values will be relative.
For our smile, we define these points with C (upper-case) command as follows.

<path d={`M ${x1} ${y1} C ${x2} ${y2} ${x3} ${y2} ${x4} ${y1}`}/>

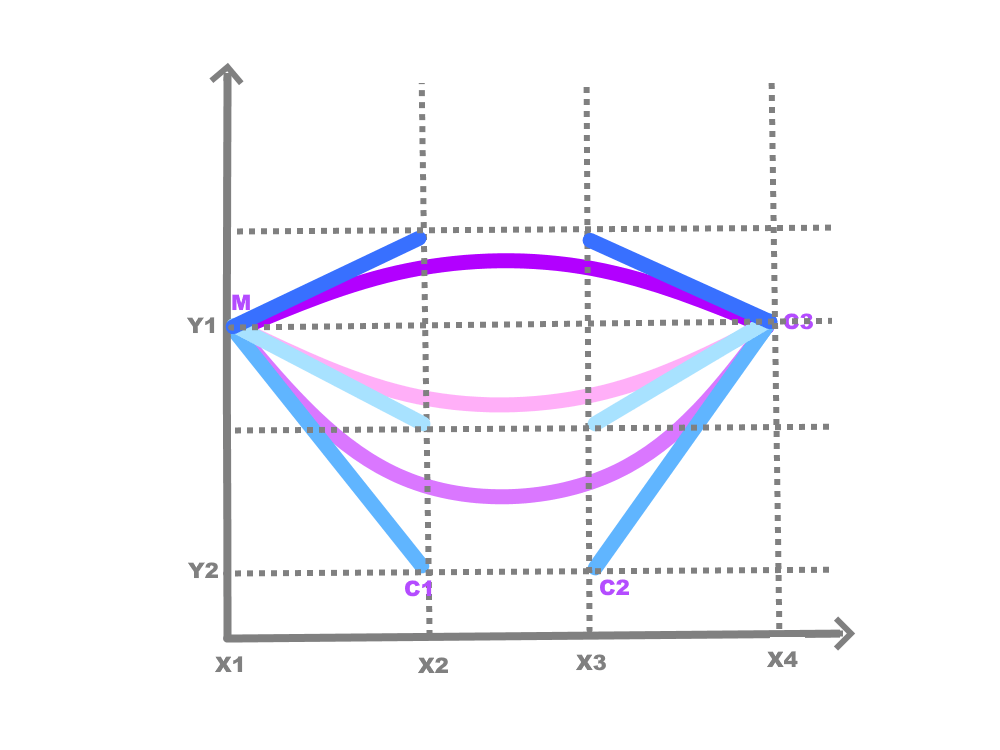
x1 and x4 are constants while x2 and x3 depends on the width (w).

w = h == 0 ? (x4 - x1)/2 : (x4 - x1)/(2 * height)

For instance lets say, Start Date is 12/25/2021, and End Date is 04/25/2022. Then Middle date will be 02/23/2022. Duration is 17 weeks and 2 days (i.e.121 days). Per our calculation, h = 61, w = 1.229 and the points for the same date in each month will look like as follows.
12/25/21β†’ x1: 130 y1: 270, x2: 131.25, x3: 278.75, x4: 280, y2: 210
1/25/22 β†’ x1: 130 y1: 270, x2: 132.5862, x3: 277.4138, x4: 280, y2: 241
2/25/22 β†’ x1: 130 y1: 270, x2: 167.5, x3: 242.5, x4: 280, y2: 272
3/25/22 β†’ x1: 130 y1: 270, x2: 132.5, x3: 277.5, x4: 280, y2: 300
4/25/22 β†’ x1: 130 y1: 270, x2: 131.2295, x3: 278.7705, x4: 280, y2: 331

The following illustration shows how our React components are organized. The Mood component contains the above calculations we made for Smile portion of the face.

The following code is the Mood components. The comple project is available in GitHub.

import React from "react";

function LeftEye(y) {
    return (
        <circle cx="120" cy="150" r="25" fill="#000" stroke="#000" strokeWidth="1" />
     );
}

const RightEye = (y) => {
    return(
        <circle cx="280" cy="150" r="25" fill="#000" stroke="#000" strokeWidth="1" />
    );
}

const getNumberOfDays = (date1, date2) => {
    return Math.ceil((date1 - date2) / (1000 * 60 * 60 * 24));
}

const Expression = () => {
    const startDate = new Date('12/25/2021').getTime();
    const endDate = new Date('4/25/2022').getTime();
    const middleDate = new Date((startDate + endDate) / 2);
    const currentDate = new Date();
    const height = getNumberOfDays(currentDate, middleDate);  // half of the number of days
    // For testing
    //const height = getNumberOfDays(new Date('4/25/22'), middleDate);
    const y1 = 270, y2 = y1 + height;

    const x1 = 130, x4 = 280;
    const width = height === 0 ? Math.abs((x4 - x1)/2) : Math.abs((x4 - x1)/(2 * height));
    const roundedWidth = Math.round(width * 10000)/10000;
    const x2 = x1 + roundedWidth;
    const x3 = x4 - roundedWidth;

    console.log(`x1: ${x1} y1: ${y1}, x2: ${x2}, x3: ${x3}, x4: ${x4}, y2: ${y2}`);
    return(
        <path d={`M ${x1} ${y1} C ${x2} ${y2} ${x3} ${y2} ${x4} ${y1}`} stroke="red" strokeWidth="5" fill="none" />  
    );
}

const Face = () => {
    return(
        <svg cx="0" cy="0" height="400" width="400">
            <circle cx="200" cy="200" r="200" fill="#FF0" stroke="grey" strokeWidth="1" />
            <LeftEye />
            <RightEye />
            <Expression />

            Sorry, your browser does not support inline SVG.       
        </svg>
    );
}

const Mood = () => {

    return(
        <Face />
    );
};

export default Mood;

Entity Framework Core with PostgreSQL

This article will explain how to work with Entity Framework Core with PostgreSQL database system. We create a simple application to add, query and remove book information.

  1. Install PostgreSQL (or Postgres) is a free and open-source relational database management system (https://www.postgresql.org/download).
  2. Install pgAdmmin, a web-based GUI tool used to interact with the Postgres database sessions (https://www.pgadmin.org/download).
  3. Open pgAdmin and create a new database (right click on Databases and follow the options).
  4. Create a table under the database (Right click on Tables and follow the options).

Make sure to add primary key if you need one. In our example we set ISBN as the primary key.

  1. Create a new Console Application project using .NET Core (in this case, version 3.1).
  2. Create a new class for Book entity to keep related data.

As you notice, we have define metadata for Book entity using data annotations (System.ComponentModel.DataAnnotations and System.ComponentModel.DataAnnotations.Schema).

[Table("Book")]
public class Book
{
    [Column("Isbn")]
    [Key]
    public string Isbn { get; set; }

    [Column("Title")]
    public string Title { get; set; }

    [Column("Author")]
    public string Author { get; set; }
}
  1. Install Npgsql.EntityFrameworkCore.PostgreSQL nuget package.

Npgsql.EntityFrameworkCore.PostgreSQL is the open source EF Core provider for PostgreSQL.

You don’t need to install Microsoft.EntityFrameworkCore as Npgsql.EntityFrameworkCore.PostgreSQL behaves like any other EF Core providers. The reason is Npgsql.EntityFrameworkCore.PostgreSQL contains Microsoft.EntityFrameworkCore.

Please remember to select the correct version based on you target .NET framework version. This project has .NET 5.0 as the target framework, so the nugets installed here are compatible with .NET 5.0.

For instance, if you try to install Microsoft.EntityFrameworkCore 6.0.1 with .NET 5.0, you will get a version incompatibility error during the installation and the nuget will not be installed.

  1. Create a class for database context to query and save instance of book entities. This class should be derived from the DbContext class which resides in EF Core package.

The DbContext class represents a session with the database which can be used to query and save instances of your entities to a database. It provides to perform certain tasks such as,
– configuring database connection, model and relationship
– querying data
– saving data
DbContext class contain DbSet property that allows to define entities in the model. For instance, BookContext class has a DbSet property of type Book. You can define multiple properties like that for your model.

public class BookContext : DbContext
{
    private readonly string connectionString;

   public DbSet<Book> Book { get; set; }

   public BookContext(DbContextOptions<BookContext> options) : base(options)
   {
   }

   protected override void OnConfiguring(DbContextOptionsBuilder optionsBuilder)
   {
      optionsBuilder.UseNpgsql"Server=localhost;Port=5432;Database=BooksDb;User Id=john_doe;Password=xxxxxx;");
   }
}

The OnConfiguring() method allows us to select and configure the data source to be used with a context using DbContextOptionsBuilder. Please note hard-coded password is not a best practice, but we have done it here to keep everything simple and focus on the use of EF with Postgres.

The OnModelCreating() method allows us to configure the model using ModelBuilder. This included defining whether model has keys, if so what the different types of keys are, and relationship between entities. Following code indicates that the entity does not have a key column.

protected override void OnModelCreating(ModelBuilder modelBuilder)
{
        modelBuilder.Entity<Book>().HasNoKey();
}

In our example, we have defined the key column in the book class using data annotations. Instead of that, we can define the key as follows.

protected override void OnModelCreating(ModelBuilder modelBuilder)
{
        modelBuilder.Entity<Book>().HasKey(book => book.Isbn);
}
  1. Now you can test the manipulation of data as follows. Again… to maintain the simplicity, this code resides in Program file.

DbContext class contains behaviors to manipulate data. BookContext has derived these methods as a part of inheritance.

// Creating context object:
using var bookContext = new BookContext(new DbContextOptions<BookContext>());

// Adding a single entity:
bookContext.Add(book);
bookContext.SaveChanges();

// Adding multiple entities:
bookContext.AddRange(books);  
bookContext.SaveChanges();

// Querying entity by value:
bookContext.Books.FirstOrDefault(book => book.Isbn == "9781524714680");

// Querying all exiting entities:
var books = bookContext.Books.AsQueryable().ToList();
// Removing a single entity:
bookContext.Remove(new Book { Isbn = "9780439023528", Title = "The Hunger Games", Author = "Suzanne Collins" });
bookContext.SaveChanges();
// Removing a range of the existing entities:
var books = new List<Book>{ … }; 
bookContext.RemoveRange(books);
bookContext.SaveChanges();